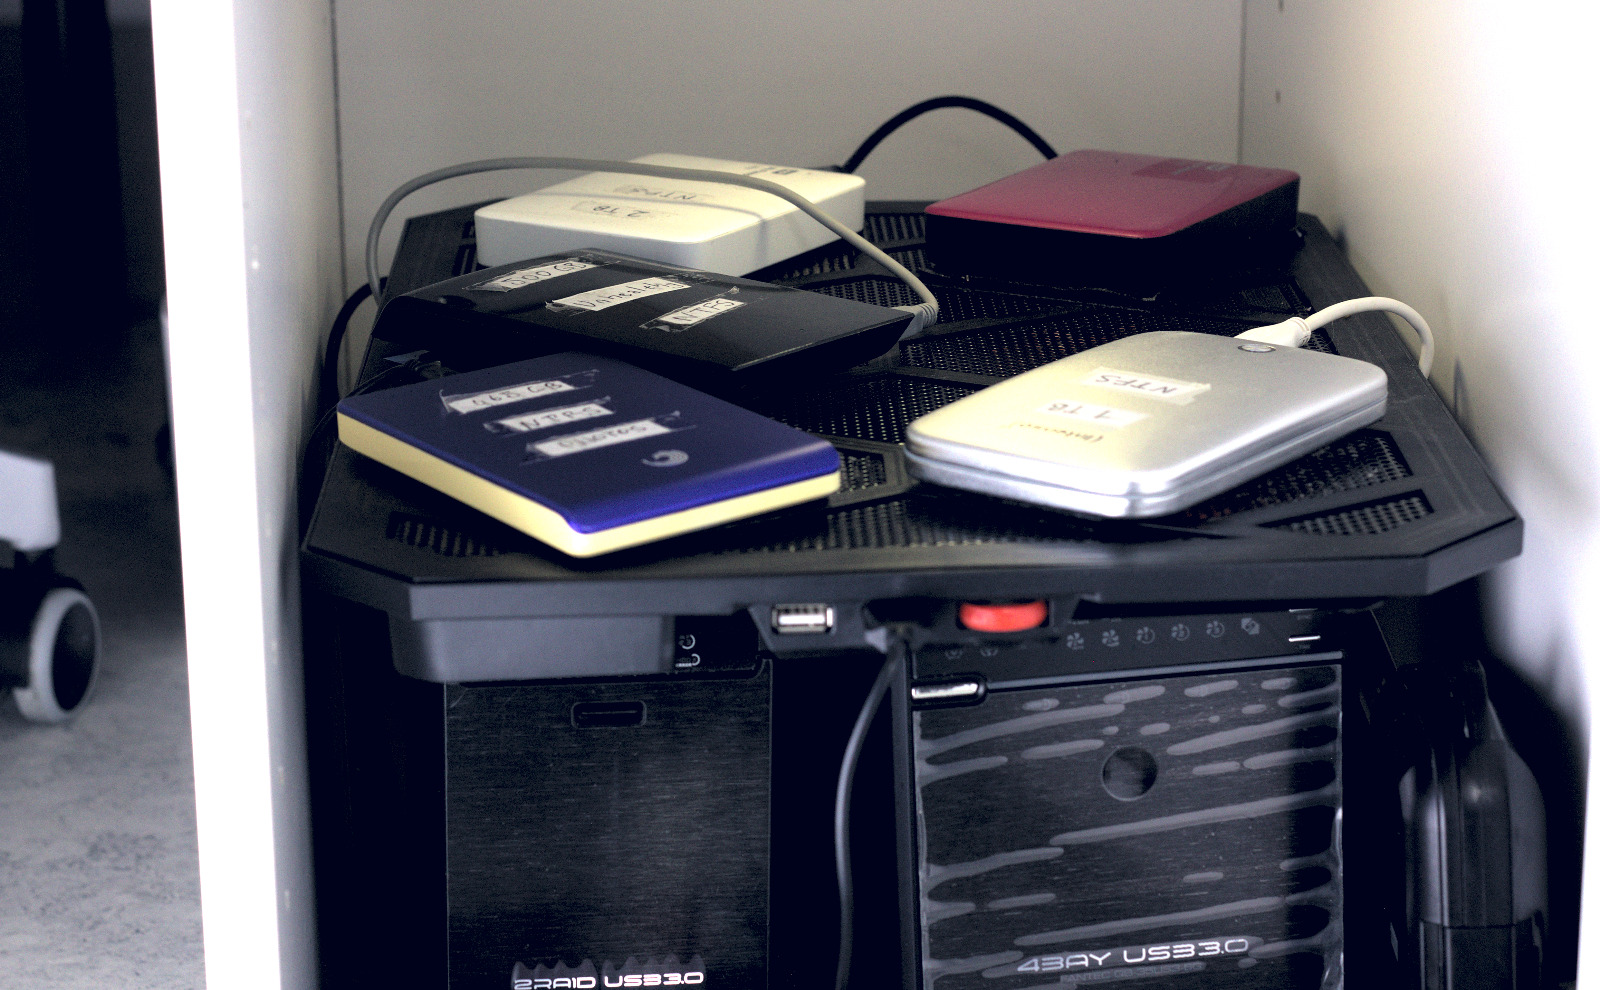
This guide is based on a true story of me setting up home data storage to add to my ghetto cloud at my apartment, as you see in the picture above.
Contents
Hardware vs. software RAID
Hardware RAID in fact uses its own compute to handle RAID, whereas software RAID depends on your host operating system and compute resources to do RAIDing.
Most RAID solutions sold as hardware RAID are in fact firmware RAID (also known as FakeRAID) that runs software RAID on your host system using a special driver. Pure hardware or software RAID is almost always a better alternative than firmware RAID. Firmware RAID is not as flexible as software RAID, locking you into proprietary hardware without offering any compute power or configuration options.
Software RAID advantages:
- No proprietary hardware is required if hardware (RAID card) fails.
- It’s not limited to the processing power provided by RAID hardware.
- It costs less than buying new hardware.
- It supports more drives than hardware RAID.
Hardware RAID advantages:
- It works on different devices running any operating system.
- It does not use host system resources.
- It is less difficult to replace a disk.
- It has fewer configurations, i.e., less work to do.
Software RAID overview
Software RAID makes the use of RAID possible without a hardware RAID controller. It’s based on the operating system and uses resources from its host system.
It’s almost always Linux-based, as the Linux ecosystem offers the most mature tools. Software RAID on Linux is also called Linux Software RAID, mdraid or MD/RAID.
Choosing RAID storage devices
RAID can be done on both HDD and SSD disks. It’s often used to increase data security for HDDs, and sometimes for SSDs, but the opposite and other use-cases exist too.
💡 Best practice is to use disks from different manufacturers if possible, otherwise different models from the same manufacturer. This mitigates issues such as:
- Disks failing together at the same time 1 .
- Size differences in raw disk 1 (see partitioning).
Software RAID options on Linux
Your software decision will be the main driver for creating the ideal Software RAID topology, due to its possibilities and limitations.
A simplified decision diagram:
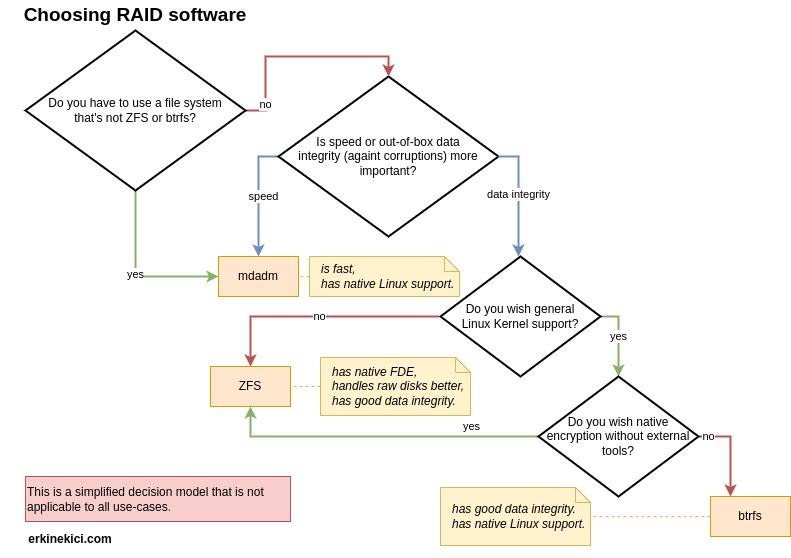
mdadm
| Repository | scm/utils @Linux Kernel |
| Initial release | 2001 |
| Guide | → MDADM + LUKS |
Overview:
mdadm abstracts different devices, thereby providing a single virtual device 2 .
Pros:
- It provides better performance because it does a better job of parallelizing writes and striping reads 3 .
- The main advantage is that it’s far more mature than the other tools 4 with good documentation for a variety of cases.
- It is included in the Linux kernel, the standard part of any Linux distribution 5 .
- It allows full disk encryption on top of RAID, which introduces a lot of pros.
- It is filesystem agnostic as opposed to ZFS and btrfs so you can install any filesystem on top of it.
Cons:
- It does not have checksumming meaning that it does not guarantee data integrity at all
3 .
- You can combine it using dm-integrity to have error checking and error correction.
- Rebuilding an array takes a long time 3 .
- You don’t have other features provided by ZFS and btrfs such as compression and snapshots.
dm-integrity
| Repository | dm-integrity.c @Linux Kernel |
| Initial release | 2017 (as part of kernel 4.12 6 ) |
The dm-integrity target emulates a block device that has per-sector tags for storing integrity information 7 .
Pros:
- Using it with
mdadm grants error detection and correction ability in a
mdadm array.
- dm-integrity will cause checksum errors when it encounters invalid data, which mdadm notices and then repairs with correct data.
- It provides write atomicity 7 .
- You can use it along with encryption without any real effort.
Cons:
- There is bunch of issues when used with other features such as RAID
6 ,
- Maintainers treat these issues as bugs and fix them, which takes time 6 .
- Using it along with
mdadm increases complexity.
- You need to study the documentation of each piece.
btrfs
| Repository | linux/kernel @Linux Kernel |
| Initial release | 2001 |
| Guide | → btrfs + LUKS |
Overview:
btrfs is different from
mdadm because it’s not a block-device RAID array but a filesystem
8 . It will not give you a new virtual device like
mdadm that will create a device like /dev/md0 and let you mount it and work on in
8 . Writing to underlying devices like /dev/sdc1 would damage the RAID array
8 . Using btrfs, you write directly to the underlying disk and it handles the mirroring behind the scenes.
Pros:
- It is included by default in Linux kernel 9 .
- It is good for data safety. Because it checks every read, so you get an error if the checksum does not match, and you can grab a good copy from the other disk 10 .
- It is faster than ZFS on NVME hardware 11 .
- It is used in production by hyperscalers such as Facebook 12 .
Cons:
- It is criticized for not being mature enough 13 , but considered mature using RAID 1 with default settings 3 .
- It does not support native encryption
14 .
- It can still be encrypted transparently by mounting an external layer or using encrypted partition 14 .
- You can not encrypt on top of btrfs using LUKS 17 .
- You can still do it using a stacked filesystem (e.g.,
ecryptfs ) on top of btrfs as an encryption layer
14 .
- In that case, you would lose some of btrfs features 15 .
- You should use btrfs on top of partitions rather than raw disks.
- This creates more overhead when replacing disks. See RAID on top of partitioning for more information.
- It is hard to replace a disk drive that is physically absent 16 18 .
- RAID 5-6 has a write-hole issue that appears when the following happens at the same time
22 :
- An unclean shutdown.
- A disk failure.
- Layering btrfs volumes on top of LVM causes issues 18 .
- For others, see Gotchas | btrfs wiki and Warnings | Debian Wiki . Other reports are often user misconfiguration issues.
ZFS
| Repository | openzfs/zfs @GitHub |
| Initial release | 2006 (by Sun Microsystems now Oracle), 2013 (OpenZFS, current maintainer 23 ) |
Overview:
It’s a combination of a filesystem like btrfs but also a volume management system 24 . ZFS should be installed on the raw disks 25 .
Pros:
- Support for FreeBSD along with Linux
26 .
- The Linux implementation has become the leading implementation and FreeBSD has been rebased on it since 2018 27 .
- Stable, fast, secure, and future-proof 28 .
- ZFS supports data and metadata checksum 13 . It can detect silent data corruption 13 .
- It includes native encryption support for 256-bit keys
29 .
- It’s faster than using another layer and supports some other native commands.
- It handles raw disks better.
- This solves the problem of some disks being slightly smaller when installed on raw disks with a reserved space partition.
- It automatically aligns partitions, thus solving the “some disks are smaller” problem 30 31 . See partition alignment.
- It enables the use of partitioning on top of RAID by eliminating partitioning overhead.
- Virtual volume management
- You can create virtual disks that you can work on and it will apply the work to other RAID devices (mirror in RAID 1 configuration) 32 .
- It makes RAID at the bottom topology easier.
- It’s something that btrfs.
Cons:
- It does not support more than one encryption key 33 .
- Native encryption does not encrypt all metadata
34 .
- It’s not full-disk encryption (FDE).
- It leaks:
- existence of files but encrypts data and metadata from files and directories (IDs)
- When you write the data, compression ratios and the names of the datasets and snapshots.
- See this list for what’s encrypted and what’s not.
- This may not be relevant for you if your threat model does not include attackers with the resources to dig into ZFS internals.
- It uses a non-GPL compliant license:
CDDL .
- Most Linux distributions do not use it due to this 35 .
- Its development is not supported by the Linux kernel
36 .
- Linus Torvalds warned kernel developers against using ZFS kernel code on Linux because he did not want the Linux kernel to get into legal trouble with Oracle in the future 37 .
- This license is pretty much impossible to change 38 .
- Ubuntu’s legal team does not consider this a problem 39 and ships ZFS as a native kernel module 40 .
Software RAID topology
Different layers in RAID topology include:
RAID at the bottom
RAID at the bottom (based on where you look at it, it can be on top as well) means that RAID should be the first layer (first thing that’s applied to disks) in the configuration. Encryption ( LUKS), partitioning, and logical volume management ( LVM) should occur on top of (after) RAID.
It’s a rule of thumb to have RAID at the lowest level, so that when one disk dies, you can swap it transparently. It lets RAID 1 mirror all other layers along with their configurations and removes the overhead of re-configuring them.
❗ It’s not always the best practice. You may need to have RAID on top based on your (rather exceptional) needs and priorities. E.g., using partitioning below RAID when using btrfs, see partitioning.
Partitioning
Partitioning overview
Partitioning is a kind of disk slicing. It divides a disk into one or more partitions. A partition is a logically contiguous area of the disk, e.g., “sectors 1 through 10,000,000”
41 . On Windows, the default partition layout consists of 1) System 2) MSR 3) Windows 4) Recovery partitions
42 . On Linux, it typically consists of a system (boot) partition (/boot or /efi), a SWAP partition, and a root partition
43 . If the disk is not used to boot any operating system but as a storage device, the layout is more flexible and can consist of a single partition.
A filesystem (also known as a file system or fs) is built on partition
41 . A partition can be set up using one of the different available filesystems
44 . For Windows, this is NTFS, exFAT, UDF, and FAT32
45 ; for Linux, this is one of the ext versions or various other options
46 .
btrfs and
ZFS used for RAIDing are also filesystems
47
48 .
A partition table is a table maintained on a disk by the operating system that outlines and describes the partitions on that disk 49 . A partitioned disk contains a partition table. The two main types are Master Boot Record (MBR) and GUID Partition Table (GPT). MBR is a legacy option, and GPT is a more modern option designed to succeed the (MBR) 50 51 . GPT should be the default decision. It is possible to convert between GPT and MBR later 52 .
You have two different options:
Partitioning topology
Partitioning on top of RAID
Partitioning after RAID, i.e., using whole disks, is the standard way. RAID at the bottom applies. You should use RAID before partitioning, as mentioned in RAID at the bottom in general.
It’s recommended by the “ ZFS Best Practices Guide” 53 25 . Because ZFS leaves a bit untouched at the end of the disk, to avoid the “some disks are slightly smaller” problem described in partition alignment, see ZFS for references. The problem is not automatically solved by btrfs or mdadm.
Pros:
- It gives you more optimization from the RAID software 54 .
- It allows software to enable the disk write cache to get better performance 53 .
- Simpler to set up, your partitions will be the same on all disks without any effort.
- Otherwise, when adding a new disk, you’ll need to create the same partition set up in it.
Cons:
- In a mirrored configuration, you need to replace failed disks with the same or larger sized disks.
- Buying the same size from a different manufacturer/model may not meet your size needs.
- Disk size may change per manufacturer/model (e.g., 16 TB can be 14900 GB in reality for one manufacturer, 14800 GB in another).
- You may have to buy a larger disk and waste the extra empty space on the disk.
- Buying the same size from a different manufacturer/model may not meet your size needs.
- Boot issues
RAID on top of partitioning
For this option, you may go against the rule of thumb and should still consider using RAID on top of partitioning. Doing partitioning first is also recommended by Debian to partition the disks before RAIDing with btrfs 56 55 . Some use-cases include:
- Mirroring drives of different sizes.
- If you do not want to RAID all the space on the disk.
- Using GPT devices on some ASRock motherboards 57 .
- You will have a simple partition configuration that’s unlikely to change.
❗️ You should not use RAID with partitions of the same storage device because it would not increase either redundancy or performance.
Pros:
- Best practice with btrfs recommended by ArchLinux 55 Debian 56 .
- It ensures your software can deal with disks of slightly different sizes
2 .
- A model from one manufacturer may not have the same raw disk size as another disk of the same size from a different model/manufacturer.
- E.g., two 2 TB disks may have different raw disk sizes.
- See also partition alignment.
- Tools like btrfs 58 and ZFS allow you to mix drives of different sizes and types.
- A model from one manufacturer may not have the same raw disk size as another disk of the same size from a different model/manufacturer.
- It aligns you with software that expects partitions first.
- It may protect you from software that sees your data as junk in the drive and tries to erase it.
- It prevents some specific motherboards from rendering GPT disks unusable
57 .
- This is a reported ASRock motherboard behavior where its UEFI implementation zeroes out RAID meta-data during the start-up process 59 .
- It allows you to use two disks of different sizes.
- But in RAID 1 configuration, it wastes extra space on the bigger disks.
- You’ll end up with a mirror with the same capacity as the smaller disk 60 .
- E.g., if you have 16 TB and 14 TB you’ll have 14 TB of storage.
- But in RAID 1 configuration, it wastes extra space on the bigger disks.
- Using a partition allows you to be sure of disk alignment.
Cons:
- It adds management overhead (one more configuration).
- E.g., you need to create new partitions for a new disk if a disk fails in a mirrored configuration.
- It reduces flexibility.
- This prevents you from re-partitioning the disk inside the RAID.
- ❗️ It will be almost impossible to change the partitions later on without breaking the RAID.
- It complicates aligning your data on hard drives with 4K sectors or flash drives
61 .
- The MBR configuration makes it challenging to align logical sectors and wastes more space 62 .
- It wastes some disk space (almost insignificant) 61 .
- Potential challenges when booting from disk 62 .
- Some tools like
util-linuxandfindmnthave issues with partitioning 63 .
Partition alignment
Aligning partitions can help you with:
- Increasing the performance of disks. This can be configured by choosing a partition start.
- Changing failed disks with new ones is less of a headache when using RAID on top of partitioning. This can be configured by setting a fixed partition size that’s less than the actual size of the disk.
You can run sudo parted /<device> print to see the alignment of an existing disk.
Choosing the partition start:
A good practice is to start partition on the same boundary to ensure alignment. This ensures ideal performance during data access 64 . This is an action performed by the operating system as the default partitioning strategy 64 .
Another good practice is to start from the 1 MiB (2048 * 512 bytes, i.e., 1049 kB) boundary that’s used by Windows and most Linux software, such as fdisk
64 ,
LVM
64
65 and
LUKS
66 .
Choosing the partition end:
You can use all the remaining space (100% value in parted). It would work well with two same-sized (which I have) disks, but may create issues when replacing a failed disk with another model/manufacturer, such as when the hard drive capacity is different from the advertised size.
Partitioning explains this varying size problem as an argument in favor of partitioning before RAIDing.
ZFS solves this issue automatically (
ZFS) but you need to solve it yourself using
mdadm or
btrfs.
Here are my results for the different 2 TB disks:
| Disk | Size | Manufacturer | Model | Size in bytes |
|---|---|---|---|---|
sda | 2000 GB | Samsung | ATA SAMSUNG HD204UI | 2000398934016 |
sdd | 2000 GB | Samsung | ATA Samsung SSD 860 | 2000398934016 |
nvme0n1 | 2000 GB | Samsung | Samsung SSD 980 PRO 2TB | 2000398934016 |
sdh | 2000 GB | WD | WD My Passport 0827 | 2000365289472 |
sdi | 2000 GB | WD | WD My Passport 259F | 2000365289472 |
sdm | 2000 GB | WD | WDC WD20 EARS-00MVWB0 | 2000398934016 |
As you can see in the table, sizes in bytes may change per manufacturer or per model by the same manufacturer. The change is not so big. We see that some WD models (sdh and sdi) have 31 MiB less space (33644544 bytes ≈ 33644 KB ≈ 33 MB ≈ 31 MiB). It’s a small percentage of around 0.0016% but enough to create problems. It’s around 257 MB for 16 TB, but I will use 10 GB less than the actual disk size to be on the safe side, it may be too much for you, in that case I’d recommend at least 200 MiB.
If you also wish to be on the safe side when replacing disks, do not use all the remaining space (100%) but hard code a value that’s less than the remaining space. To do that, you can check the size of your disk in MiBs or MBs and go down a little bit from the original size. Here’s a nice command to do that (change /dev/sdc to your
identified disk): sudo parted '/dev/sdc' unit mb print.
If you have a more complex set up using more disks, you can use different tools to see how you can best combine your disks. You can refer to
btrfs disk usage calculator website or install and use
python-btrfs package (and use it by, e.g., btrfs-space-calculator -m RAID1 -d RAID1 4TiB 6TiB 8TiB)
67 .
The recommended layout would be:
- Start: 1 MiB
- Start: 100 MiB less than
df <disk-name> -m
Using LVM with RAID
Logical volume management (LVM) is a form of storage virtualization that enables easier administration of disk storage space management than traditional partitioning. It’s a device mapper framework that provides logical volume management for the Linux kernel 68 .
It allows you to slice and dice RAIDed disks into logical volumes. Use it if you plan to change your disk layout in the future, because it makes it easier to move filesystems.
btrfs as ZFS has the concept of subvolumes, but this is different from LVM volumes. A LVM volume is a block device on its own, allowing different filesystems. Meanwhile, a btrfs volume is more like a POSIX file namespace that’s not treatable as a block device. You can access this namespace via the top-level subvolume of the filesystem, or mount it on its own 69 70 .
💡 Add LVM if there’s a good reason to. Otherwise, do not use it due to the overhead of maintaining its configuration.
Pros:
- You can easily grow and shrink partitions/filesystems 71 ,
- You can dynamically create new partitions
71 ,
- You can add more storage to existing filesystems without having to move data around 72 .
- You can mount the snapshots as read-only or writable partitions 71 .
- It provides LVM mirroring functionality.
- It does not replace RAID 1 because it’s slower and less reliable for prevention of data loss 73 .
- Online resizing and relocating the filesystem across devices
74
- RAID software may still support it, e.g., btrfs can do it offline 74
Cons:
- Configuration overhead with a new layer of complexity, aka more to do.
- Raw partitions are slightly faster than logical volumes 74 75 .
Encrypting with software RAID
Choosing a secret strategy
You need to make the following decisions here:
- Use passphrase vs. key-file. The key file allows you to mount the array permanently because it’s a file on a disk that can be read at boot time. Doing this using a password instead of key files will require you to store the password on a disk first, which kills the purpose of using a password over key files that are harder to crack. You can also combine both. Build a script like mount that will prompt you for a password and combine it with a key file (e.g., on a USB device) to generate a key for LUKS. None of these solutions protects you from an attacker torturing you or putting you in jail until you reveal the password.
- Use a single password for all disks, or key files per disk. More key files lead to more maintenance and possibly more security if they’re stored in different offline locations.
You may also want to consider what will happen after your death. You can give USB sticks to your friends and family where your keys and encryption instructions exit. But you may not want them to go through complicated decryption steps to get your message from the grave while full of emotions.
Using LUKS, you do not need to make the best decision initially because it lets you change your passphrases and key files later on. See changing keys.
Encryption topology
Some RAID software, such as ZFS has encryption built-in; for others, you can use another encryption layer such as VeraCrpyt or LUKS (most popular in RAIDs).
Encryption should be on top of RAID if you don’t have strong reasons not to.
💡 You should use FDE (full-disk encryption) over filesystem encryption. You can apply it to a raw disk, partition, or a volume. Encrypting the filesystem is not as secure as full partition encryption, and is arguably harder to use, as well as slower 76 .
❗️ Whole disk encryption on top of RAID using LUKS is not an option with btrfs because btrfs does not create any virtual device 8 and encrypting its partition would delete its metadata, thus breaking RAID 17 . Another option you have is to use a stacked filesystem (e.g., ecryptfs ) as an encryption layer on top of btrfs 14 , and you can then use some of btrfs features 15 .
Encryption on top of RAID
Encryption should occur after (on top of) RAID when possible, due to reasons explained in
RAID at the bottom. This is done by setting up a plain RAID 1 and then encrypting the volume. It’s the recommended configuration (also by cryptsetup
77 ). It allows you to:
- do RAID maintenance without decrypting, thus decreasing attack vectors,
- replicate encryption configuration without re-configuring each disk,
- skip double encryption.
If you’re using LVM you should order encryption based on your needs:
- Use encryption on top of LVM to set up different passwords for different logical volumes
78 .
RAID ⇾ LVM ⇾ Encryption layer (e.g., LUKS) ⇾ Filesystem (e.g., ext4)
- Use encryption below LVM if all logical volumes share the same passwords and settings like key length and password
78 .
- It reduces the complexity and overhead of having more than one LUKS partition 78 .
RAID ⇾ Encryption layer (e.g., LUKS) ⇾ LVM ⇾ Filesystem
RAID on top of encryption
Use-cases for this include:
- Your RAID software does not support otherwise, such as btrfs 17 .
- You want to use a different passphrase for each disk in the array.
Cons of using encryption before/below RAID:
- It is slower due to more CPU cycles used because of encryption on data on each disk 79 .
- It is harder to use, configure, and maintain.
- It requires more configuration to replace a disk.
- It introduces a chance of mistakenly replacing a failed disk with a new one without setting up encryption configuration when a disk fails.
- It leads to more difficult key management. You need to keep the encryption keys for the different RAID components in sync or manage them somehow 17 .
- Debugging RAID issues becomes much harder 80 .
- You cannot do automatic RAID assembly anymore 80 .
- It introduces the risk of unintended data exposure by adding a decrypted member.
Pros of using encryption before/below RAID:
- It allows you to use a different passphrase for each disk on the array.
- It gives you a little bit more speed due to the more CPUs allocated 80 .
- It works with all filesystems with RAID functionality, such as btrfs 17 .
LUKS
LUKS (Linux Unified Key Setup) is a standard specifying full disk (or full volume encryption) implementation 81 .
LUKS on Linux can encrypt a partitionless disk, disk partition or loop-file 82 . It allows using encryption before or after RAIDing supporting both topologies. It’s typically used on either a disk partition or a LVM physical volume, which would allow different partitions in the same encrypted container 83 .
The following packages provide reference implementations in Linux 81 :
cryptsetup(frontend, i.e., the binaries) 84 ,dm-crypt(kernel module, part of the device mapper infrastructure, see diagram) 84 .
It operates on a particular block device, and exposes a new block device, which is the decrypted version 83 . Accessing a new device will trigger transparent encryption and decryption while it’s in use 83 .
LUKS can use either:
- An interactive passphrase that the user enters (max 512 characters 77 ),
- or a key file (maximum 8192 kB 77 ) as a key.
When encrypting, LUKS generates a master key and stores it as metadata at the start of device 83 . That means that the LUKS passphrase is not the master key and the passphrase is not used in deriving the master key 82 . This metadata consists of different slots where each slot includes a passphrase, salt, and a copy of master key 83 . It allows the use of different passphrases to access the key.
When encrypting, LUKS combines the user’s entered passphrase or key file with each of the salts, hashes the results, and tries to result as keys to decrypt the message in each slot to find the master key, then uses the master key to encrypt and decrypt the container 83 . The key remains decrypted in RAM while the container is in use 83 . If an attacker steals the master key, user passwords remain unknown to him/her.
LUKS stores some metadata at the start of the device. It works by creating a master key for the disk.
RAID maintenance and operations
See also scrubbing.

Extending and shrinking
Extending and shrinking should always go from the bottom of the stack in
RAID topology, when shrinking from the top
79 . So, for example, topology with RAID to logical volumes (using LVM), encryption (using LUKS), and filesystem (ext4) (RAID ⇾ LVM ⇾ LUKS ⇾ ext4), it would look like this:
Extending 79
- Add new disks and create md RAID.
- Add mdX device to the volume group.
- Extend the logical volume.
- Extend the LUKS device.
- Extend ext4.
Shrinking 79
- Shrink FS.
- Shrink the LUKS device.
- Shrink the logical volume.
Handling when a disk fails
When a disk fails, first take a deep breath, and do not take any quick action. A wrong action would cause more harm than good, such as a non-recoverable array 135 . Follow the official documentation.
Most of the data losses reported on the mailing lists of ZFS, btrfs, and mdadm are due to user errors made when trying to recover a failed array.
You should never use a trial-and-error approach. Most people use btrfs check --repair on
btrfs RAID when encountering issues, but it’s actually the last command you want to run.
You should understand what to expect from the solution you’re using, how it works, and how each system implements a specific functionality.
See also:
Guide for mdadm, LUKS, and RAID
The topology:
Filesystem     ⇽ top
|
Disk encryption (LUKS)
|
RAID (mdadm)
|
Raw partitions
|
Raw disks      ⇽ bottom
The good:
- It supports any filesystem.
- It supports whole disk encryption on top of RAID.
The bad::
- It does not include automatic data integration checks and corrections that would lead to data loss.
1. Create mdadm array
You create the array on raw disks or partitions like sudo mdadm --create /dev/name /dev/sdb1 /dev/sdc1 --level=1 --raid-devices=2
85 .
A parametrized script would look like:
  # Configurations:
  raid_device_name='mdadm_raid1'
  raid_device_path="/dev/md/$raid_device_name"
  raided_device_list=(
    '/dev/sdc1'
    '/dev/sdb1'
  )
  # --
  yes | sudo mdadm \
    --create \
    "$raid_device_path" \
    "${raided_device_list[@]}" \
    --level=1 \
    --raid-devices="${#raided_device_list[@]}" \
    --verbose
  echo "Created raid device at $raid_device_path"
The
mdadm tool will start to mirror the drives. This can take some time to complete, but the array can be used during this time. You can monitor the progress of the mirroring by checking the /proc/mdstat file using cat /proc/mdstat.
You can also find out your
mdadm device name using cat /proc/mdstat:

You can watch the progress live by running watch cat /proc/mdstat
You can interrupt this RAID re-sync progress by entering sudo shell sudo -i and then running echo 0 > /proc/sys/dev/raid/speed_limit_max in sudo shell
86 , to revert this change, run echo 200000 > /proc/sys/dev/raid/speed_limit_max. If you do not want to enter sudo shell, you can run sudo sh -c "echo '0' > /proc/sys/dev/raid/speed_limit_max" do pause and sudo sh -c "echo '200000' > /proc/sys/dev/raid/speed_limit_max" to continue.
Once
mdadm completes creating the array, you can run mdadm --detail /dev/md0 to verify that everything is good, and it outputs State: Clean.
To stop the array and release disks, you can run sudo mdadm --stop /dev/md127. This is good for testing. But once you have data, you should think twice before running these commands.
If you want to remove a disk or disk array, you can zero out their md superblocks using the --zero-superblock like in the following code:
raided_device_list=(
  '/dev/sdc1'
  '/dev/sdb1'
)
for device_path in "${raided_device_list[@]}"; do
  sudo mdadm --zero-superblock "$device_path"
done
2. Encrypt
Encrypt:
# Configurations:
pass_phrase='secret' # Or randomize ⇾ pass_phrase="$(tr -dc 'A-Za-z0-9!"#$%&'\''()*+,-./:;<=>?@[\]^_`{|}~' < /dev/urandom | head -c 30; echo)"
raid_device_path='/dev/md/mdadm_raid1'
# --
echo -n "$pass_phrase" | \
  sudo cryptsetup luksFormat \
  --batch-mode \
  --type luks2 \
  "$raid_device_path"
Unlock:
# Configurations:
pass_phrase='secret' # Or randomize ⇾ pass_phrase="$(tr -dc 'A-Za-z0-9!"#$%&'\''()*+,-./:;<=>?@[\]^_`{|}~' < /dev/urandom | head -c 30; echo)"
raid_device_name='mdadm_raid1'
raid_device_path="/dev/md/$raid_device_name"
unlocked_device_name="$raid_device_name-unlocked"
# --
echo -n "$pass_phrase" | sudo cryptsetup luksOpen \
  "$raid_device_path" \
  "$unlocked_device_name"
3. Create the filesystem
You can create the filesystem on disk using:
- ext4:
sudo mkfs.ext4 <device-path> - btrfs:
sudo mkfs.btrfs <device-path>
# Configurations:
raid_device_name='mdadm_raid1'
unlocked_device_name="$raid_device_name-unlocked"
unlocked_device_path="/dev/mapper/$unlocked_device_name"
# --
sudo mkfs.ext4 "$unlocked_device_path"
4. Mount
Most file managers support this kind of set up out-of-the-box. If you look at your devices, you’ll see your drive as an encrypted device. Opening it would prompt you for a password.
You can mount it using sudo mount '<unlocked-device-path>' e.g., sudo mount /dev/mapper/mdadm_raid1-unlocked.
  # Configurations:
  mount_target="/media/${SUDO_USER:-${USER}}/raid-test"
  raid_device_name='mdadm_raid1'
  unlocked_device_name="$raid_device_name-unlocked"
  unlocked_device_path="/dev/mapper/$unlocked_device_name"
  # --
  mount_user="${SUDO_USER:-${USER}}" # Works in both sudo context and not
  sudo mkdir -p "$mount_target"
  sudo chown "$mount_user:$mount_user" "$mount_target"
  sudo mount "$unlocked_device_path"
Guide for btrfs, LUKS, and RAID
The topology:
RAID and Filesystem (btrfs)  ⇽ top
|
Disk encryption (LUKS)
|
Raw partitions
|
Raw disks      ⇽ bottom
The good: It’s based on packages (
btrfs and LUKS) that the Linux kernel includes and maintains. They have good integrity checks.
The bad:: It’s harder to configure and harder to replace a disk. This includes cons of using RAID above the encryption layer and RAID above partitioning due to btrfs limitations. It also requires a manual configuration of partition alignment.
Step-by-step guide
1. Identify disks
We need to first identify the names of our devices. Disks are typically called sdX (in most cases, sda and sdb) for SSD and HDD, whereas for NVME storage the names are nvme0 and nvme1. Devices using disk ID uses the /dev path format such as /dev/sdc and /dev/sdb.
The tools you can use include:
- GUI options:
- GNOME Disks (
gnome-disk-utility) gparted
- GNOME Disks (
- Command line options:
- Find in
lsblk. - Find it by looking inside
/devfolder. - Find by manufacturer model:
- List manufacturers:
find /sys/devices -type f -name model -exec cat {} \;. - Note the name of the manufacturer.
- Find through manufacturer’s name:
hwinfo --block --short | grep TOSHIBA.
- List manufacturers:
- Find in
Find the names of the devices (e.g., sdc and sdb) and note them down to use in the next steps.
2. Clean-up
If you already have partition tables or a filesystem you might want to clean the disks up.
If you use NVME or SSD, a good practice is to empty them using blkdiscard to start with
67 before partitioning. You can run sudo blkdiscard /dev/<target device>. It instructs the firmware of the driver that the disk is empty, and it helps to improve the performance and wear of the disks
67 . It will discard all the data, meaning that you will lose all data on the device
87 .
Using an HDD, you can do it using the partition manager tool in the next step
when creating partitions. Or you can run sudo wipefs -a /dev/<target device> to keep the old data but delete the signatures or run cat /dev/zero > /dev/<target device> to clear all data (that can take a while)
88 .
If you are unsure if you have an SSD or HDD disk, you can run lsblk -d -o name,rota | grep <target device> and check for the number. If it’s 1 you have an HDD, if it’s 0 an SSD
89 .
The scripted approach would look like:
# Configurations:
disk_path='/dev/sdc'
# ---
disk_info=$(lsblk -d -o name,rota | grep "$disk_name")
if echo "$disk_info" | grep -q 1; then # An HDD
  echo 'Wiping HDD.'
  sudo wipefs -a "$disk_path"
elif echo "$disk_info" | grep -q 0; then # An SSD
  echo 'Wiping SSD.'
  sudo blkdiscard "$disk_path"
else
  >&2 echo '❌ Cannot clean up the disk, an SSD or HDD?'
  exit 1
fi
echo 'Completed cleanup.'
3. Partition
Here you will create a partition table and layout.
The tools you can use include:
- Command line:
parted - GUI: GNOME Disks (
gnome-disk-utility),gparted
This guide uses parted to be able to document the steps (by code). It also helps automate the preparation of a new RAID disk.
Quick reference for units of measurement for storage data 90 91 :
| Short | Name | Size |
|---|---|---|
MiB | Mebibyte | 1024 KiB |
KiB | Kibibyte | 1024 Bytes |
MB | Megabyte | 1,000 KB |
KB | Kilobyte | 1,000 Bytes |
💡 You should read about
partition alignment to decide your configuration. In summary, it will tell you to start the partition from 1 MB and end it before reaching 100% of the disk (like 200 MiB before, just to be on the safe side).
Steps would be:
parted /dev/<device>- Start a
partedsession. - E.g.,
sudo parted /dev/sdc.
- Start a
mklabel <partition-table>- Set up a partition table.
- E.g.,
mklabel gpt.
mkpart <partition-type | partition-name> [file-system-type] <start> <end><partition-name><partition-type>[file-system-type]<start>- It should be 1 MiB, see partition alignment.
<end>- It can be
100%for using the whole remaining space, or a hard-coded value for more safety. - See also: partition alignment.
- It can be
- E.g.,
mkpart my-btrfs btrfs 1MiB 100%to create a partition for the whole disk (this is probably not what you want, see partition alignment).mkpart my-btrfs btrfs 1MiB 15TBto create a partition for a hard-coded size.
Your partition set up depends on your use-case. There’s no perfect generic set up. If you plan to boot your OS from RAIDed disks, your partitioning must follow OS requirements. In that case, refer to the OS documentation to create the right partitions. In my use-case, I will use RAIDed disks as storage without OS installation. And I have two 16 TiB disks and my single partition for back-up storage layout will look like this:
- Partition table: GPT because it’s newer and better (see partitioning overview).
- Partition start: 1 MiB (1049 kB) for better performance (see partition alignment).
- Partition end: 14892 GiB (15990 GB).
- My disk is 16 TB that’s 14902 GiB (16001 GB) but I will use 14892 GiB (15990 GB) to be on the safe-side when replacing a failed disk.
- It’s around 10 GiB (11 GB) less than my original disk size.
- You should also use less than what your disk offers; see partition alignment for more in-depth information.
A scripted way for my layout would look like this:
# Configurations:
disk_path='/dev/sdc'
partition_start='1MiB'
partition_end='14892GiB'
partition_label='encrypted-raid1-partition'
# --
sudo parted --script "$disk_path" \
  mklabel gpt \
  mkpart "$partition_label" "$partition_start" "$partition_end"
You can verify your configuration by running:
sudo parted /dev/<device> printto see partition-related information.lsblk /dev/<device>to see that the device has a partition named with1as a suffix, e.g.,sdcwould havesdc1.
And run the same commands for every disk you wish to include in RAID, e.g., /dev/sdb1.
4. Encrypt
As an encryption layer, we’ll use LUKS to encrypt the partition we created. According to best practice (see encryption topology), we should encrypt the partitions after we create them. But we cannot do full-disk encryption (LUKS) over btrfs 8 so doing this encryption first is the single option.
Now we need the names of the partitions created by the previous step. You can find them by running lsblk /dev/sdX for each disk and then note down the partition names. If a disk is /dev/sdc, its partition will look like /dev/sdc1. You can also use it in other ways described in
identifying disks.
The steps would be:
Create LUKS containers
You should have already decided on a strategy until here. See encryption strategy for guidance. This part will show you how to set it up using a password. If you’re unsure, no worries, LUKS supports adding and removing keys and options later on 77 , see adding a new decryption key for instructions.
❗️ Ensure the device is not mounted before this step. You can run sudo umount '/media/..' to verify this.
You can then create containers using:
- Password:
sudo cryptsetup luksFormat --type luks2 <target device>. - Or key file:
cryptsetup luksFormat /dev/xvdb --key-file /path/to/key/file.- You can generate a key file by running
openssl rand -out /path/to/key/file "$(( 8192 * 1024))
- You can generate a key file by running
Then follow the on-screen instructions.
You can choose to use LUKS1 for compatibility reasons, but LUKS2 should be the default choice.
If you want to achieve this non-interactively:
# Configurations:
pass_phrase='key' # Or randomize ⇾ pass_phrase="$(tr -dc 'A-Za-z0-9!"#$%&'\''()*+,-./:;<=>?@[\]^_`{|}~' < /dev/urandom | head -c 30; echo)"
partition_name='sdc1'
partition_path="/dev/$partition_name"
# --
echo -n "$pass_phrase" | \
  sudo cryptsetup luksFormat \
  --batch-mode \
  --type luks2 \
  "$partition_path"
A good idea may be to create a backup key by setting up one more passphrase. LUKS supports up to 32 different phrases/keys 77 .
Back-up LUKS headers
For each encrypted container (partition), run cryptsetup luksHeaderBackup --header-backup-file ~/<target device>.header.bak /dev/<target device>.
It’s highly recommended because:
- If the header of a LUKS volume gets damaged, all data is permanently lost unless you have a header-backup 77 .
- Damaging the LUKS header is something people manage to do with surprising frequency 77 .
Unlock LUKS containers
This step is also known as mapping, decrypting, or mounting.
This step results in a decrypted disk in /dev/mapper/ that we can write to. The first thing is to decide what the disk name will be inside this folder. A good convention that I use is to put the -unlocked suffix on the partition name. If the partition name is sdc2, the mapped (decrypted) device would be sdc2-unlocked. If it were using UUIDs instead, the device name will be {uuid}-unlocked. This naming convention tells you both what you’re unlocking and why this disk exists (because it’s an unlocked variant of another disk).
We can then run: sudo cryptsetup luksOpen <target device path> <unlocked device name>. Following the naming convention of this guide, it would look like sudo cryptsetup luksOpen /dev/sdc1 unlocked_sdc1.
You can verify this by
- running
sudo cryptsetup status <unlocked device name>on an unlocked device, - running
sudo cryptsetup luksDump /dev/<device name>on an encrypted device, - and ensuring a mapped drive exists in
ls /dev/mapper/.
If you wish to close it, you can use luksClose such as sudo cryptsetup luksClose <unlocked device name>. E.g., sudo cryptsetup luksClose unlocked_sdc1.
So if we wanted to run all the steps non-interactively, the script would look like:
# Configurations:
pass_phrase='key' # Or randomize ⇾ pass_phrase="$(tr -dc 'A-Za-z0-9!"#$%&'\''()*+,-./:;<=>?@[\]^_`{|}~' < /dev/urandom | head -c 30; echo)"
partition_name='sdc1'
partition_path="/dev/$partition_name"
unlocked_device_name="$partition_name-unlocked"
# --
echo -n "$pass_phrase" | sudo cryptsetup luksOpen \
  "$partition_path" \
  "$unlocked_device_name"
This example uses temporary naming with sdXX convention. If you want to re-use this script in the future, you should use persisted naming (UUID)s instead for reliability. It would then look like:
# Configurations:
pass_phrase='key' # Or randomize ⇾ pass_phrase="$(tr -dc 'A-Za-z0-9!"#$%&'\''()*+,-./:;<=>?@[\]^_`{|}~' < /dev/urandom | head -c 30; echo)"
partition_uuid='8ea6a2df-9e34-427d-a3f7-be64a943948f' # Get from `lsblk -dno UUID /dev/sdb1`, `blkid -s UUID -o value /dev/sdc1`, or `sudo cryptsetup luksUUID /dev/sdc1`.
unlocked_device_name="$partition_uuid-unlocked"
# --
echo -n "$pass_phrase" | sudo cryptsetup luksOpen \
  "/dev/disk/by-uuid/$partition_uuid" \
  "$unlocked_device_name"
4. RAID
The steps would be:
- Create btrfs RAID array
- Mount your RAID array
- Mount temporarily for testing or password-based usage.
- Mount permanently
Create btrfs RAID array
In this step, we will install btrfs filesystem that will give us the RAID functionality.
Foremost, we need the
btrfs-progs package that provides userspace
btrfs utilities. All major Linux distributions have it in their package managers.
- Ubuntu/Debian:
sudo apt update && sudo apt install btrfs-progs -y. - Arch Linux:
pacman -S btrfs-progs. - Fedora:
sudo dnf install btrfs-progs -y. - openSUSE:
zypper install btrfsprogs
Now, we will use the encrypted devices created/mapped by LUKS. If you follow this guide, names will be something like /dev/mapper/sdc1-unlocked and /dev/mapper/sdb1-unlocked. If you do not remember the names, you can run ls /dev/mapper/*-unlocked. The next step is to install the
btrfs filesystem on both devices. To achieve that, we can run
129 :
sudo mkfs.btrfs \
  --label 'btrfs-raid1-array' \
  --data 'raid1' \
  '/dev/mapper/sdc1-unlocked' \
  '/dev/mapper/sdb1-unlocked'
You could also specify --metadata raid1 or -m raid1, but this is not needed because
btrfs mirrors metadata of two devices by default
130 .
You can now run sudo btrfs fi show to verify that your system recognizes the configuration.
Mount encrypted BTRFS raid
You can now mount one of the disks to start using it. btrfs will copy your data from one to the other. Don’t try to mount both disks to avoid boot issues; mount one of the disks 131 .
You can mount temporarily when following this guide to ensure your configuration works, and then move to mounting permanently.
Mount temporarily
Pros:
- It is good for testing or debugging, e.g., to ensure RAID behaves as expected.
- It increases your security by not requiring you to store passphrases or key files on a disk.
- It allows you not to store passwords on your system, protecting you from decryption by an attacker once he/she is inside your computer.
- But if an attacker establishes permanent access to your computer (such as by installing a key sniffer), he can still get your password once you type it in.
- It protects you against physical theft.
Cons:
- Disk access will not survive reboots.
- If you’re using a file manager and not scripts, you’ll need to unlock both devices by entering twice.
- You can prepare a script file to automate this and hide encrypted volumes from the GUI, or use the one from this guide: the “mount script”.
How:
You can use a GUI tool or the following script to mount a disk. Both methods allow you to unlock on-demand and load the disk using a file manager.
Using the terminal way:
Create the mount target, e.g.,
/media/<os user>/raid-test:mount_target="/media/${SUDO_USER:-${USER}}/raid-test" mount_user="${SUDO_USER:-${USER}}" # Works in both sudo context and not sudo mkdir -p "$mount_target" sudo chown "$mount_user:$mount_user" "$mount_target"Mount the target using either:
- UUID of the
btrfs array.
- Run
sudo btrfs fi showand note down the UUID. - Run
sudo mount --uuid 'a25f49d4-f3ff-4e11-b03c-83c118c0dab4' "$mount_target"
- Run
- One of the unlocked disks, e.g.,
/dev/mapper/sdb1-unlocked:sudo mount '/dev/mapper/sdb1-unlocked' "$mount_target"- This is good for quick testing, but unreliable for repeated use.
- If you want to reuse your mount script, you should use the UUID from the btrfs array.
- UUID of the
btrfs array.
To confirm the mount status, you can check:
sudo mount | grep "$mountable_disk",sudo df -h "$mountable_disk",sudo btrfs filesystem usage "$mountable_disk"to display btrfs specs,- or look at your file manager visually.
A deeper way to verify that RAID is working includes:
- Creating a file in it.
- Unmounting using, e.g.,
sudo umount "$mount_target"or another tool. - Mounting the other partition, for example, with the above script (change the
mountable_diskvariable). - Ensure you can find the same file.
This is good for testing, but this configuration will not persist. See mount permanently for persistent option.
See also mount script for reusable mount script using UUIDs.
Mount permanently
Pros:
- It enables automation.
- It allows you to, e.g., handle maintenance tasks such as scheduled scrubbing in an automated way.
- It is more convenient by not requiring you to remember and enter any password.
- It protects you against physical theft if you store your key in a USB drive and disconnect it when not using it.
- Here is a nice guide: Unlock LUKS Encrypted Volumes at Boot With a USB Key | willhaley.com to help you with that.
Cons:
- It allows less dedicated attackers to reach your files without much effort.
- But there are different ways to mitigate this. You can still install and use file-system level encryption inside the LUKS container for sensitive data as another layer of protection.
How:
You can use it with any GUI tool or edit fstab. We’ll look at both.
Using a GUI tool (gnome-disk-utility):
- On every disk, click on the encrypted partition, go to settings, then “Edit encryption options” and configure them with your passphrase:

- ❗️ gnome-disks stores passwords in cleartext for automounting encrypted partitions 132 .
- On one of the disks, click on
btrfs filesystems, go to settings, and configure auto-mount:
- On other disks, click on other
btrfs filesystems, go to settings, and configure them to hide in the UI, so they won’t appear in file managers.
❗️ Prefer to use UUIDs and NOT /dev/sdXn, If you use /dev/sdXn the drives can spontaneously re-assign themselves and any scripts or programs which use sdXn assignments will break or affect partition negatively
133 . fstab steps would look like:
- Edit
/etc/fstabby e.g.,- Using nano:
sudo nano /etc/fstab - Using vim:
sudo vim /etc/fstab
- Using nano:
- Automatically unlock LUKS devices on boot:
- Use
sudo blkid /dev/<partition name>to get the UUID of each partition. - Create entries for each encrypted container using, e.g., a key file at
blkid /etc/cryptkey luks:data1 UUID=xxxxxxxx-xxxx-xxxx-xxxx-xxxxxxxxxxxx /etc/cryptkey luks,noearlydata2 UUID=xxxxxxxx-xxxx-xxxx-xxxx-xxxxxxxxxxxx /etc/cryptkey luks,noearly
- Use
- Automatically mount
btrfs filesystem on boot:
- Take note of the RAID’s UUID.
- ❗️ Not the UUID of partitions, but the RAID.
- You can find it using a GUI tool or by running:
sudo btrfs fi show- or
sudo blkid --match-token TYPE=btrfs.
UUID=xxxxxxxx-xxxx-xxxx-xxxx-xxxxxxxxxxxx /media/encrypted-raid1 btrfs defaults,noatime,compress=zstd 0 2- Mount point will be
/media/encrypted-raid1, - Add the
autodefragoption to enable automatic defragmentation; useful for files with a high number of random writes, such as databases or virtual machine images. - UUID here does not work if your operating system does not run
btrfs device scan before mounting (using, e.g.,
initrd).- Most Linux distributions scan for encrypted devices and btrfs filesystems once decrypted automatically.
- Then you need to use the device name from one of the encrypted containers, which is
/dev/mapper/sdc1-unlocked - If you followed this guide, your names would be something like
/dev/mapper/sdc1-unlocked,/dev/mapper/sdb1-unlocked. If you do not remember the names, you can runls /dev/mapper/*-unlocked
- Mount point will be
- Take note of the RAID’s UUID.
- If you use a desktop environment, you may want to hide other disks from file managers.
In case you are unsure about which UUID is to be ignored, you can check them with
blkid | grep LUKS.Add the following entry for each device in the array that’s not the one that’s mounted (from the previous step):
/dev/disk/by-uuid/5778004d-632d-4476-8306-1671d6f964aa /mnt/nonexistent auto nosuid,nodev,nofail 0 0
You can then reboot (e.g., by using sudo reboot) and confirm the mount status again.
Hide encrypted disks
If you use a desktop environment, you may want to hide encrypted files from file managers.
- First, get the UUIDs of your encrypted devices. If you are unsure about which UUID is to be ignored, you can check them with
blkid | grep LUKS. - You can then create a file called
/etc/udev/rules.d/90-hide-raid-partitions.rules134 .- E.g., by running
sudo vim /etc/udev/rules.d/90-hide-raid-partitions.rules
- E.g., by running
- Then add the following for each UUID:
ENV{ID_FS_UUID}=="xxxxxx-xxx-xxx-xxx-xxxxxx",ENV{UDISKS_IGNORE}="1"134 .
An automated script would look like this:
#!/usr/bin/env bash
partition_uuids=(
  # Get encryption partition uuids from `lsblk -dno UUID /dev/sdb1`, `blkid -s UUID -o value /dev/sdc1`, or `sudo cryptsetup luksUUID /dev/sdc1`.
  '131e56c3-1270-4001-a437-42a3e6f1cd7c'
  '01124774-c982-428f-af1e-c3eaffe9359f'
  # Get btrfs partition uuid by running `sudo btrfs fi show` once you unlock disks
  'd7cb9164-e887-4621-b7b1-9f9392fbe2bd'
)
rule_file='/etc/udev/rules.d/90-hide-raid-partitions.rules'
for uuid in "${partition_uuids[@]}"; do
  line="ENV{ID_FS_UUID}==\"$uuid\",ENV{UDISKS_IGNORE}=\"1\""
  sudo grep -qF --no-messages "$line" "$rule_file" || {
    echo "$line" | sudo tee -a "$rule_file"
  }
done
sudo udevadm control --reload-rules
sudo udevadm trigger
echo "Updated $rule_file."
Further maintaining the btrfs RAID array
Do not forget to calm down and then plan all your steps in advance, so you know what you are doing. Failing in one of the steps and the need to redo the steps may create challenges 135 . If you are unsure what to do, you should refer to the btrfs mailing list .
If you want to replace a disk or add a new disk to the array, you can run the preparation steps provided in the automated script.
For other administrative tasks, such as replacing a failed disk, see the official btrfs documentation .
Scrubbing
In a btrfs RAID setup, it’s necessary to frequently run a btrfs scrub to check for corrupted blocks or flipped bits and repair them using a healthy copy from one of the mirror disks. The btrfs-scrub manpage suggests running it monthly 136 . This is an important aspect of maintaining a healthy array, otherwise it may cause you data loss, just like it did for Linus Tech Tips .
The command is btrfs scrub start /mount-point.
Scheduled scrubbing
A good way to ensure scrubbing gets done is to set up a scheduled job.
If your operating system supports systemd, you can set up a systemd service with a systemd-timer that’s used to run an automatic
btrfs scrub each month
136 :
First create btrfs-scrub.timer in /etc/systemd/system/btrfs-scrub.timer:
  [Unit]
  Description=Run Btrfs Scrubbing Service monthly
  Documentation=man:btrfs-scrub

  [Timer]
  # First Saturday of every month
  OnCalendar=Sun *-*-1..7 3:00:00
  # Triggers the service if it missed the last start time
  Persistent=true

  [Install]
  WantedBy=timers.target
We use Persistent=true to ensure that systemd runs our service on the next possible occasion if the computer is not available on the specified date
137 . We don’t need to specify a service name because we’ll name our service as btrfs-scrub.service that systemd will automatically match our timer
138 .
Now create btrfs-scrub.service /etc/systemd/system/btrfs-scrub.service.
For our service, we have two options. If you don’t use encryption, or
automatically mount and decrypt your disk array, you can run btrfs scrub start directly, which is the simplest option, but not necessarily the most secure. Here’s a way of doing it
139 :
  [Unit]
  Description=Btrfs Scrubbing Service
  Documentation=man:btrfs-scrub

  [Service]
  Type=simple
  ExecStart=/home/bob/user/scheduled-jobs/services/btrfs-scrub.sh

  [Install]
  # Wait for network services and logins
  WantedBy=multi-user.target
If you have a password and do not store it on a disk, then this service must first prompt you for a password, decrypt the disks, mount the array, and then run the job. I will open-source my solution to this.
You can now notify systemd about the new service: sudo systemctl daemon-reload. After that, you need to enable the timer unit: sudo systemctl enable btrfs-scrub.timer. The next time you boot, it will trigger the timer. To start it without booting, you will run sudo systemctl start btrfs-scrub.timer. You can also run the service without a timer by executing sudo systemctl start btrfs-scrub.service.
- Check status:
systemctl status btrfs-scrub.service. - View logs:
sudo journalctl -u btrfs-scrub.service -f\. - Stop service:
sudo systemctl stop btrfs-scrub.service\.
Add a new decryption key
LUKS allows you to change your secret strategy or existing secret.
First, we need to find the device node path of the encrypted device. It can be /dev/sdc1 or something like /dev/mapper/sdc1-unlocked. If you’re unsure, you can find it by running blkid -t TYPE=crypto_LUKS. We’ll refer to it as /dev/sdc1 as example in this guide.
To add a new password, you can run:
cryptsetup luksAddKey /dev/sda3.
It will prompt you for any existing password, then create a new one.
To add a new key file, you can run:
cryptsetup luksAddKey /dev/sda3 /path/to/key/file
If you are missing a key file, you can generate one by:
openssl rand -out /path/to/key/file "$(( 8192 * 1024))
You should then back up your LUKS headers again.
Automation scripts
Here are reusable, production-ready scripts you can use to prepare disks and mount your array.
Grand automation script
This script does every step provided in this guide.
 .
.
❗️ This script destroys all the data on disks, so be careful and run it at your own risk.
You can use it by following the steps below:
- Change the “Manual configurations” part on top.
- Save it (e.g., by
script.sh). - Make it executable (
chmod +x script.sh). - Run it (
sudo ./script.sh).
See the grand automation script
#!/usr/bin/env bash

# Following script (1) cleans up disks, (2) partition disks, (3) encrypts partitions, (4) opens encrypted containers, (5) RAIDs containers.
# Use-cases:
#   - Prepare disks before RAIDing them with btrfs. In that case comment out 'raid' from 'steps' variable because you should add new disk to array manually.
#   - Test RAID configuration
#   - Create RAID configuration initially
# ⚠️ Change manual configurations below according to your needs.

# ----------------------
# Manual configurations:
# ----------------------
  declare -ra disk_names=(
    'sdc'
    'sdb'
  )
  declare -r partition_start='1MiB'
  declare -r partition_end='14892GiB'
  declare -r partition_label='encrypted-raid1-partition'
  declare -r encrypted_partition_header_backup_folder="/home/bob/user/backup/.luks-backup"
  declare -r passphrase='secret' # Or randomize with "$(tr -dc 'A-Za-z0-9!"#$%&'\''()*+,-./:;<=>?@[\]^_`{|}~' < /dev/urandom | head -c 30; echo)"
  declare -ra steps=( # Comment out steps as you wish, each step requires step before so you should know what you're doing.
    'cleanup'   # Cleans partition table and partitions from each disk.
    'partition' # Creates desired partition layout and partitiin table (gpt) in each disk.
    'encrypt'   # Creates encrypted LUKS container in each partition.
    'backup'      # Backs-up LUKS partition headers.
    'unlock'      # Opens each LUKS container in decrypted from.
    'raid'      # Creates RAID array that spans across LUKS containers from each disk partition.
  )
# ----------------------

# Ensure admin privileges
if [ "$EUID" -ne 0 ]; then
  script_path=$([[ "$0" = /* ]] && echo "$0" || echo "$PWD/${0#./}")
  sudo "$script_path" || (
    echo '🔐 This script requires administrator privileges.'
    exit 1
  )
  exit 0
fi

# Prepare partitioned and encrypted disks
declare -a unlocked_device_paths=()
for disk_name in "${disk_names[@]}"; do
  # Prepare variables
  disk_path="/dev/$disk_name"
  partition_name="$disk_name"'1'
  partition_path="/dev/$partition_name"
  unlocked_device_name="$partition_name-unlocked"
  unlocked_device_paths+=("/dev/mapper/$unlocked_device_name")
  echo "💽 Configuring $disk_path (partition name: $partition_name path: $partition_path, encrypted device name: $unlocked_device_name)."

  # ----------------------
  # 1. Cleanup
  # ----------------------
  if [[ "${steps[*]}" =~ 'cleanup' ]]; then
    echo '🧹 Cleaning up....'
    disk_info=$(lsblk -d -o name,rota | grep "$disk_name")
    if echo "$disk_info" | grep -q 1; then # An HDD
      echo 'Wiping HDD.'
      sudo wipefs -a "$disk_path" || {
        >&2 echo '❌ Could not wipe the HDD, is luksClose or umount required?'
        exit 1
      }
    elif echo "$disk_info" | grep -q 0; then # An SSD
      echo 'Wiping SSD.'
      sudo blkdiscard "$disk_path" || {
        >&2 echo '❌ Could not wipe the SSD, is luksClose or umount required?'
        exit 1
      }
    else
      >&2 echo '❌ Cannot clean up the disk, an SSD or HDD?'
      exit 1
    fi
    echo '✅ Completed cleanup.'
  fi


  # ----------------------
  # 2. Partition
  # ----------------------
  if [[ "${steps[*]}" =~ 'partition' ]]; then
    echo '🪓 Creating partition table and layout...'
    sudo parted --script "$disk_path" \
      mklabel gpt \
      mkpart "$partition_label" "$partition_start" "$partition_end" || {
        >&2 echo '❌ Cannot partition the disks.'
        exit 1
      }
    echo '✅ Completed creating partition table and layout.'
  fi

  # ----------------------
  # 3. Encrypt
  # ----------------------
  if [[ "${steps[*]}" =~ 'encrypt' ]]; then
    echo '🔑 Creating an encrypted LUKS container...'
    echo -n "$passphrase" | \
      sudo cryptsetup luksFormat \
      --batch-mode \
      --type luks2 \
      "$partition_path" || {
        >&2 echo '❌ Cannot encrypt the disk.'
        exit 1
      }
    echo '✅ Completed creating an encrypted LUKS container...'
  fi

  # ----------------------
  # 4. Backup
  # ----------------------
  if [[ "${steps[*]}" =~ 'backup' ]]; then
    echo "💾 Backing up LUKS header in $encrypted_partition_header_backup_folder..."
    sudo mkdir -p "$encrypted_partition_header_backup_folder"
    sudo cryptsetup luksHeaderBackup \
      --header-backup-file "$encrypted_partition_header_backup_folder/$partition_name".header.bak \
      "$partition_path" || {
        >&2 echo '❌ Cannot backup LUKS header.'
        exit 1
      }
    echo "✅ Completed backing up LUKS header in $encrypted_partition_header_backup_folder."
  fi

  # ----------------------
  # 5. Unlock
  # ----------------------
  if [[ "${steps[*]}" =~ 'unlock' ]]; then
    echo '👀 Decrypting the LUKS container...'
    echo -n "$passphrase" | sudo cryptsetup luksOpen \
      "$partition_path" \
      "$unlocked_device_name"  || {
        >&2 echo '❌ Cannot decrypt the disk.'
        exit 1
      }
    echo '✅ Completed decrypting the LUKS container...'
  fi
done

# ----------------------
# 6. RAID
# ----------------------
if [[ "${steps[*]}" =~ 'raid' ]]; then
  comma_separated_devices=$(echo \""${unlocked_device_paths[*]}"\" | tr ' ' '", "')
  echo "💾 RAIDing $comma_separated_devices..."
  sudo mkfs.btrfs \
    --label 'btrfs-raid1-array' \
    --data raid1 \
    "${unlocked_device_paths[@]}"
  echo "✅ Completed RAIDing $comma_separated_devices."
fi
Mount script
This script allows you to unlock the encrypted disks and mount them. It removes the need to re-enter the password twice in the file manager or store the password on disk.
If you use this script as your primary way of decrypting and mounting, you can hide encrypted disks and partitions from file explorer. You can achieve this programmatically by adding x-gvfs-hide in /etc/fstab for the disks or hiding them using a GUI tool such as gnome-disk-utility:
Here’s the mount script that you can save as mount.sh, make it executable (chmod +x ./mount.sh) and run it when needed:
See the mount script
#!/usr/bin/env bash
# This is a script to unlock encrypted drives using same passwords and mount them

# Configurations
encrypted_partition_uuids=( # Get from `lsblk -dno UUID /dev/sdb1`, `blkid -s UUID -o value /dev/sdc1`, or `sudo cryptsetup luksUUID /dev/sdc1`.
  '65135c28-fc77-4c41-aa0f-3b1d9f75422a'
  '2a2fd28e-982e-4cbd-a1d8-f6a08c1d04dc'
)
brfs_array_uuid='3003372b-4201-4d1d-b8dc-8f84698e3231' # Run `sudo btrfs fi show` once you unlock disks
mount_target="/media/${SUDO_USER:-${USER}}/unlocked-btrfs-raid1"
#-
# Ensure admin privileges
if [ "$EUID" -ne 0 ]; then
  script_path=$([[ "$0" = /* ]] && echo "$0" || echo "$PWD/${0#./}")
  sudo "$script_path" || (
      echo '🔐 This script requires administrator privileges.'
      exit 1
  )
  exit 0
fi
unset passphrase
echo 'Password:'
read -rs passphrase
# Unlock disks
for uuid in "${encrypted_partition_uuids[@]}"; do
  unlocked_device_name="$uuid-unlocked"
  if ls /dev/disk/by-id/dm-uuid-*"$uuid"* 1> /dev/null 2>&1; then
      echo "Skipping. $uuid is already open."
      continue
  fi
  echo "Unlocking encrypted device $uuid."
  echo -n "$passphrase" | sudo cryptsetup luksOpen \
    "/dev/disk/by-uuid/$uuid" \
    "$unlocked_device_name" || {
        >&2 echo "❌ Could not unlock $uuid."
        exit 1
    }
  echo "✅ Unlocked to: $unlocked_device_name."
done
# Create target directory
mount_user="${SUDO_USER:-${USER}}" # Works in both sudo context and not
sudo mkdir -p "$mount_target"
sudo chown "$mount_user:$mount_user" "$mount_target"
# Mount
if mountpoint -q "$mount_target"; then
    echo "Skipping. Already mounted at $mount_target."
else
  sudo mount --uuid "$brfs_array_uuid" "$mount_target" || {
    >&2 echo "❌ Could not mount \"$brfs_array_uuid\" at \"$mount_target\"."
    exit 1
  }
  echo "✅ Mounted decrypted btrfs array at $mount_target"
fi